
Apps
Steps to Follow to Setup and Use Passkey to Sign into Your Google Account
Passwords have always been a necessity, allowing you to choose between using one that is too easy to remember or one that is secure but obscure enough to necessitate a password manager.
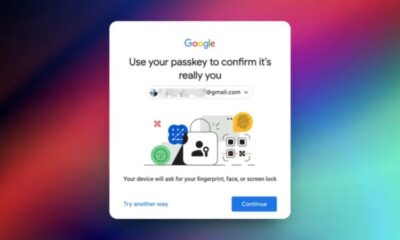
Up until now, pairing a password with two-factor authorization was the best way to keep your accounts safe. However, Google now provides an additional option: using a passkey, a safe credential that is connected to the PIN, or biometric authentication that your device already uses. This makes the passkey even safer because it only exists on your device and not in the cloud.
Do you want to try it? How to do it?
What are the hardware/software requirements?
At the moment, you can create a passkey on any hardware that is compatible, such as desktops or laptops running Windows 10 or macOS Ventura (or later) and Chrome 109, Safari 16, or Edge 109 or later. A mobile phone or tablet that runs iOS 16 or Android 9 (or later) must be used to set up a passkey. You can likewise use it with any hardware security key that supports the FIDO2 protocol.
If you want to use your phone to sign into another device, such as a laptop, you will also need to have Bluetooth turned on. Additionally, you will need to enable a screen lock.
Lastly, you won’t be able to create a passkey for a Google Workspace account you have through a school or employer. However, you can use it for any personal Google account.)
How do I set it up?
- Go to g.co/passkeys to start.
- On the off chance that you have an Android phone already signed into that account, you might have been automatically registered for a passkey. If that is the case, the device will be listed under Passkeys created automatically, and you can simply click the blue button labeled “Use Passkeys.”
- After that, a pop-up will appear letting you know that you can now use a passkey. Click Done.
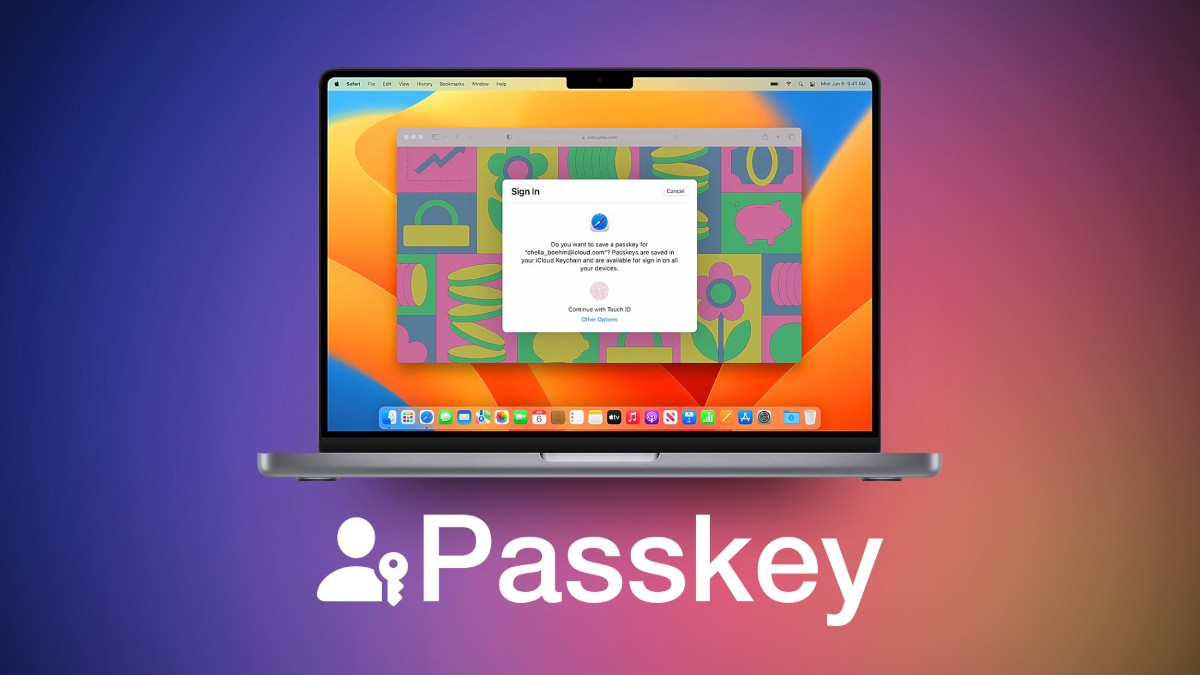
- Select the Create a Passkey button at the bottom of the page if your device isn’t listed (which it probably won’t be if you’re using an iPhone). Note: At this point, using the device you want to use as a passkey will be much simpler; in other words, if you want to use your iPhone, follow these directions with your iPhone rather than your computer.)
You will be prompted to select Use another device in a pop-up that allows you to use either the device you are currently using as the passkey (in which case select Continue). If this is the case, you will be given a QR code to scan using the camera on your phone.
You might also be asked to enable iCloud Keychain on an iPhone.
You’re done now!
What should I do if I lose or sell a passkey-enabled device?
If the passkey was one that you created, you can get rid of a device from your list of passkeys.
- Go to the Google account you have.
- Scroll down to How you sign in to Google after selecting Security in the left-hand column. Choose Passkeys.
- Click the X next to the passkey you want to delete under Passkeys you created.
You must sign that device out of the account to delete the passkey if it was generated automatically by Google.
- Go to Security in the left column, as in the previous example, but this time select Manage all devices by scrolling down.
- Choose to Sign Out after selecting the phone from which you want to sign out.
Can I stop using passkeys altogether?
Yes. You can resume using passwords and two-factor authentication if you so choose. Note: The account will still contain the passkeys; They simply won’t be used.)
- Go to your Google account > Security
- Scroll down to Skip password when possible and toggle it off


The Psychographic Playbook: Aligning Your Messaging with Your Audience’s Core Values

How to Watch the Perseid Meteor Shower 2026 and Other July Meteor Displays

Homecoming in Harmony: Bismil’s Delhi Mehfil Struck All the Right Chords

Alicia Lacao-Green gains worldwide fame owing to her amazing transformations via make-up and contouring.
Amplifyou, an amazing agency for eCommerce
Vasid Qureshi, India’s Top Blogger Shares 5 Tips to Go Viral on Social Media

The Psychographic Playbook: Aligning Your Messaging with Your Audience’s Core Values
Successful branding is not about knowing who your customers are or what they buy; it’s about knowing how to brand...

How to Watch the Perseid Meteor Shower 2026 and Other July Meteor Displays
The Perseid meteor shower has become active starting July 17, joining two additional meteor showers and increasing the likelihood of...

Homecoming in Harmony: Bismil’s Delhi Mehfil Struck All the Right Chords
Home has a way of changing the rhythm of a performance. Familiar lyrics carry a little more weight, pauses linger...


Luxury Homes Have Changed. Who’s Protecting the Owner?
Why Nataliya Palakanis believes the future of luxury residential construction isn’t bigger homes; it’s better governance. Luxury residential construction has...


Future Earns 12th Billboard 200 No. 1 Album With The Real Me
Future secures his 12th No. 1 album on the Billboard 200 as his newest studio project, The Real Me, debuts...
-

 Lifestyle4 weeks ago
Keith Sanders of Raleigh Discusses the Role of Volunteer Firefighters in Strengthening Local Communities
-

 Entertainment1 week ago
Post Malone Debuts New Song During FIFA World Cup 2026 Final Closing Ceremony
-

 Entertainment1 week ago
Shakira and Burna Boy’s “Dai Dai” Continues Global Chart Reign After FIFA World Cup 2026
-

 Entertainment3 weeks ago
Shakira and Burna Boy’s “Dai Dai” Earns Second Week at No. 1 on Billboard Global Excl. U.S.
-

 Entertainment2 weeks ago
Daytime Emmy Awards 2026: Talk Show Nominees Announced
-

 Sports2 weeks ago
Argentina vs Switzerland, 2026 FIFA World Cup – Preview, Prediction, Head to Head, Predicted Lineups, Team Squads and More
-

 Sports4 weeks ago
Wimbledon Championships 2026: How to Watch Live, Schedule and Where to Watch Live Without Cable on TV
-
Sports4 weeks ago
Wimbledon 2026: Schedule, TV Coverage and Live Streaming Details